

Here is a comprehensive, stage-by-stage filing process complete with the official forms and documents for salaried employees returned to India. You can use this as a standalone section or a downloadable cheat sheet for your blog to make the entire compliance journey easy to understand.
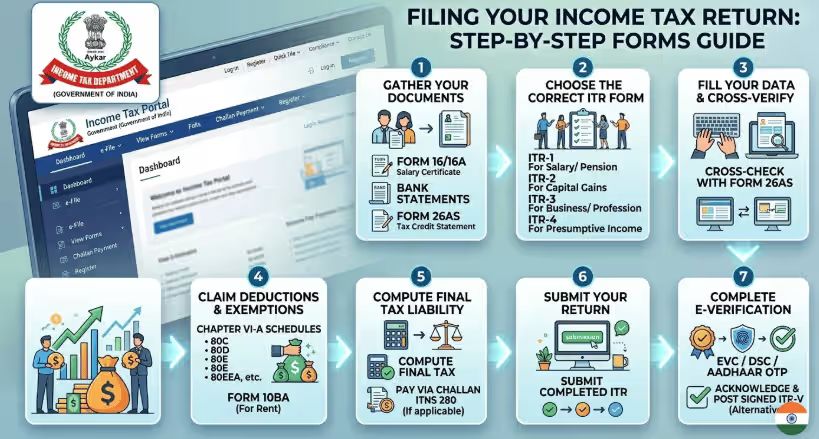
The Step-by-Step Tax Filing Process for Returning Employees
Stage 1: The Pre-Filing Phase (Gathering Documents)
Before looking at your foreign income, you need to consolidate your Indian tax records.
- Form No. 124 (Investment & Deduction Declarations): To claim local tax benefits like House Rent Allowance (HRA), Leave Travel Concession, or home loan interest deductions through your payroll, you must submit your evidence and particulars to your Indian employer using Form No. 124.
- Form No. 130 (Indian Salary Certificate): If you joined an Indian company after returning, your employer will issue your certificate of tax deducted at source on your salary in Form No. 130 (the new equivalent of the traditional Form 16) by June 15th of the following financial year.
- Form No. 168 (Annual Information Statement – AIS): Before filing anything, log into the designated tax portal and download your Annual Information Statement in Form No. 168. This statement is pre-filled by the government and contains records of your specified financial transactions, tax payments, and taxes deducted at source.
Ask your CA
“My Annual Information Statement (Form No. 168) shows my overseas remittances. Have we reconciled this with the income we are declaring?”
Why ask this: The tax department tracks your money movement. If your foreign remittances or foreign bank interest show up in your Annual Information Statement (AIS) and your CA ignores them while filing, your return will likely be flagged as defective.
Check out: "Returned to India mid-year? A first-return foreign-income tax Guide for salaried employees 2026"Stage 2: The Cross-Border Phase (Securing Foreign Tax Relief)
If your residential status makes your global income taxable in India, you must actively claim relief so you aren’t taxed twice on the salary you earned abroad.
- Form No. 44 (Foreign Tax Credit): To actually claim credit for the taxes you already paid overseas, you must furnish a statement in Form No. 44. This form must be accompanied by an official certificate of tax deduction or an acknowledgment of your online tax payment/bank counterfoil from abroad. Crucial Rule: You must file Form No. 44 on or before the date you furnish your actual return of income.
- Form No. 41 (Double Taxation Relief): If you are claiming double taxation relief under a Double Taxation Avoidance Agreement (DTAA) between India and your former country of residence, you must provide the necessary information and maintain supporting documents using Form No. 41.
Ask your CA
“I don’t have an official tax certificate from the foreign government. How will we prepare Form No. 44 to claim my Foreign Tax Credit?”
Why ask this: To avoid double taxation, you must file Form No. 44. If you lost access to your foreign employer’s portal or don’t have a foreign tax authority certificate, the law allows you to use a self-certified statement—but only if it is backed by online payment counterfoils or bank challans. Ask your CA how to legally structure this self-certified proof.
Stage 3: The Filing Phase (Choosing the Right ITR)
Selecting the wrong tax form is the most common reason returnees face defective return notices.
Why you CANNOT use Form SAHAJ (ITR-1) or SUGAM (ITR-4): You are legally disqualified from using these simple forms if you have any income from a source outside India, if you hold any asset (including financial interests) outside India, or if you have signing authority in any account located outside India.
- Use Form ITR-2: If your transition year involves only salaried income, but you have foreign bank accounts, foreign stocks (like RSUs), or foreign salary to declare, you must step up to ITR-2.
- Use Form ITR-3: If, in addition to your salary, you carried out freelance work, consulting, or earned any income under the head “Profits and gains of business or profession” during the year, you must use ITR-3.
Ask your CA
“Which specific schedules in ITR-2 are we using to disclose my retained foreign bank accounts and unvested RSUs?”
Why ask this: If you qualify as an ordinary Resident, you are legally required to disclose all foreign assets—including empty bank accounts and unvested stock options—even if they generated zero income. Make sure your CA is filling out the Foreign Asset (Schedule FA) sections, otherwise you risk severe penalties for non-disclosure under the Black Money Act

Stage 4: The Submission Phase (Deadlines & Verification)
The Deadline: For a standard individual assessee, your return of income must be furnished on or before July 31st of the assessment year.No Attachments Allowed: Your return must be filed electronically. You are not allowed to attach manual documents, computation sheets, or proof of tax deducted directly with your electronic return. These must be kept safely in your files in case the Assessing Officer demands them.
- Verification (Form ITR-V): Simply uploading the return is not enough. You must verify it electronically using a digital signature, an electronic verification code (EVC), or by transmitting the data electronically and submitting the verification via Form ITR-V
Must Check out: Foreign Income Documents for salaried employees 2026: Important"Conclusion
While the shift from foreign tax jurisdictions back to the Indian system involves specific forms—like Form No. 168 (AIS) for local transparency and Form No. 44 for foreign tax credits—the key to a seamless filing lies in early preparation.
By consolidating your global income documents, correctly identifying your residential status, and selecting the appropriate ITR form (remembering that ITR-1 is off-limits for those with foreign assets), you protect yourself from “defective return” notices and ensure you aren’t paying a rupee more than necessary.
Ask your CA
“Based on my exact arrival date, what is my precise residential status under the 60-day and 182-day rules?”
Why ask this: Many CAs mistakenly apply the 182-day rule to everyone. If you were in India for 365 days in the preceding four years, spending just 60 days in India this year might trigger Resident status. If you are an Indian citizen with over ₹15 lakhs in Indian income, the threshold is 120 days. Knowing your exact status (Resident, NR, or RNOR) dictates whether your foreign income is taxed at all.
Leave a Reply